LAB 1.6 Connecting Internet with Wireless
at MikroTik Routerboard
Saya disini akan membagikan tutorial Koneksi Internet dengan Wireless di MikroTik Routerboard.
I will here share tutorials Internet connection with Wireless in MikroTik Routerboard
Tujuan
Purpose
Purpose
- Untuk mengetahui cara Konfigurasi Wireless di MikroTik Routerbard
- To find out how to Configuration Wireless on MikroTik Routerbard
- Untuk mengetahui cara DHCP Client, Konfigurasi IP Address, dan menambahkan Firewall di MikroTik Routerboard
- To find out how to DHCP Client, Configuration IP Address, and add a firewall in MikroTik Routerboard
Langkah-langkah
Steps
Hal-hal yang harus diperlukan:
Things that should be required:
- MikroTik Routerboard
- MikroTik Routerboard
- Kabel UTP
- UTP Cable
- Kabel Power
- Power Cable
- Aplikasi Winbox
- Winbox application
1. Disable-kan Adapter Ethernet dan VirtualBox-Host Only Network
1. Disable the Ethernet Adapter and VirtualBox Host-Only Network

2. Buka aplikasi Winbox, klik icon "[...]"
2. Open the Winbox application, click icon "[...]"

3. Pilih koneksi menggunakan "MAC Address" untuk terhubung dMikroTik Routerboard
3. Select the connection using the "MAC Address" to connect with MikroTik Routerboard
3. Select the connection using the "MAC Address" to connect with MikroTik Routerboard

4. Ketikan nama user "admin" dengan password kosong. Jika sudah, klik "Connect"
4. Write user name "admin" with a blank password. If you already, click "Connect"

5. Klik "System" yang berada di Tab Menu MikroTik Routerboard, kemudian pilih "Reset Configuration"
5. Click the "System" tab located on the menu MikroTik Routerboard, then select "Reset Configuration"

6. Ceklis "No Default Configuration" untuk mereset MikroTik Routerboard tidak dalam keadaan kofigurasi default pabrik. Lalu pilih "Reset Configuration"
6. Checkbox "No Default Configuration" to reset MikroTik RouterBOARD not in a condition kofigurasi factory defaults. Then select "Reset Configuration"

7. Pilih "Yes", jika ingin mereset semua konfigurasi dan reboot
7. Select "Yes", if you want to reset all configuration and reboot
7. Select "Yes", if you want to reset all configuration and reboot

8. Setelah itu, keluar dari aplikasi Winbox
8. After that, exit the application Winbox

9. Buka kembali aplikasi Winbox, kemudian klik icon "[...]"
9. Re-open Winbox application, then click on the icon "[...]"

10. Pilih koneksi menggunakan "MAC Address" untuk terhubung dengan MikroTik Routerboard
10. Select the connection using the "MAC Address" to connect with MikroTik Routerboard

11. Ketikan nama user "admin" dengan password kosong, kemudian pilih "Connect"
11. Write user name "admin" with a blank password. If you already, click "Connect"

 |
| Tampilan setelah masuk ke MikroTik Routerboard melalui aplikasi Winbox Display after entering into MikroTik RouterBOARD via Winbox application |
Konfigurasi Koneksi Internet dengan Wireless di MikroTik Routerboard
Configuration Internet Connection with Wireless in MikroTik RouterBOARD
Configuration Internet Connection with Wireless in MikroTik RouterBOARD
1. Klik "Wireless" yang berada di Tab Menu MikroTik Routerboard
1. Click the "Wireless" tab located on the Menu MikroTik Routerboard

2. Klik Interfaces "wlan1" yang masih disable, kemudian klik icon "ceklis" untuk enable-kan interface "wlan1"
2. Click the Interfaces "wlan1" are still disabled, then click "checklist" to enable the interface "wlan1"
 |
| Tampilan Interfaces "wlan1" yang masih disable Display Interfaces "wlan1" are still disabled |
 |
| Tampilan setelah Interface "wlan1" yang sudah di enable Display after Interface "wlan1" which has enabled |
3. Klik 2x pada Interface "wlan1"
3. Double click On Interface "wlan1"

4. Masuk ke Tab "Wireless", kemudian pilih "scan" untuk mencari Wi-Fi yang ada di sekitar anda
4. Go to the tab "Wireless", then select "scan" to search for Wi-Fi are all around you

5. Akan terlihat Wi-Fi yang ada di sekitar anda
5. It will be seen that there is a Wi-Fi around you

6. Pilih Wi-Fi yang ingin anda koneksikan pada MikroTik Routerboard, kemudian klik "Connect"
6. Select Wi-Fi you want to connect on MikroTik Routerboard, then click "Connect"

7. Klik "Apply" dan "Ok"
7. Click "Apply" and "Ok"

8. Terlihat pada Inteface "wlan1" belum terhubung dengan Wi-Fi yang anda pilih
8. Seen on Interface "wlan1" not connected to Wi-Fi is selected

9. Masuk ke Tab "Security Policies", kemudian klik icon "+" untuk menambahkan kebijakan keamanan untuk Wi-Fi yang sudah dipilih
9. Go to the tab "Security Policies", then click "+" to add a security policy to Wi-Fi is already selected

10. Masukkan nama security yang ingin dibuat, kemudian aktifkan "WPA EAP, WPA2 EAP, dan tkip" di bagia nomor 3 dan 4. Kemudian isikan password yang digunakan oleh Wi-Fi, apabila Wi-Fi diberikan password pengaman. Lalu klik "Apply" dan "Ok"
10. Write the name of security you want to create, then activate "EAP WPA, WPA2 EAP, and TKIP" in section 3 and 4. Then enter the password that is used by Wi-Fi, Wi-Fi when given the password security. Then click "Apply" and "Ok"

11. Kemudian terdapat "Security Policies" yang sudah anda buat
11. Then there is the "Security Policies" that you have created

12. Masuk ke Tab "Interfaces", kemudian klik 2x pada Interfaces "wlan1"
12. Go to the tab "Interfaces", then Double click on Interfaces "wlan1"

13. Ubah "Security Profile" dengan mengklik icon "tanda panah ke bawah" di bagian "Security Profile"
13. Change the "Security Profile" with clicking icon "arrow down" in the "Security Profile"

14. Pilih "Security Policies" yang sudah anda buat
14. Select the "Security Policies" that you have created

15. Klik "Apply" dan "Ok"
15. Click "Apply" and "Ok"

16. Masuk ke Tab "Registration", akan terdapat Interface "wlan1"
16. Go to the tab "Registration", will there Interface "wlan1"

17. Selanjutnya, masuk ke Tab "Interfaces". Terlihat tulisan huruf "R" yang ada di Interface
"wlan1", berarti Intefaces "wlan1" sudah terkoneksi dengan Wi-Fi yang anda pilih
17. Next, go to the tab "Interfaces". Seen writing the letter "R" in the Interface "wlan1", meaning intefaces "wlan1" is already connected to a Wi-Fi that you select

18. Click the "IP" tab located on the Menu MikroTik Routerboard, then select "DHCP Client"

19. Klik icon "+" untuk menambahkan DHCP Client
19. Click the icon "+" to add the DHCP Client

20. Ubah Interfaces dengan mengklik icon "tanda panah ke bawah" di bagian "Interface"
20. Change Interfaces with clicking icon "arrow down" in the "Interface"

21. Pilih Interface "wlan1"
21. Select Interface "wlan1"
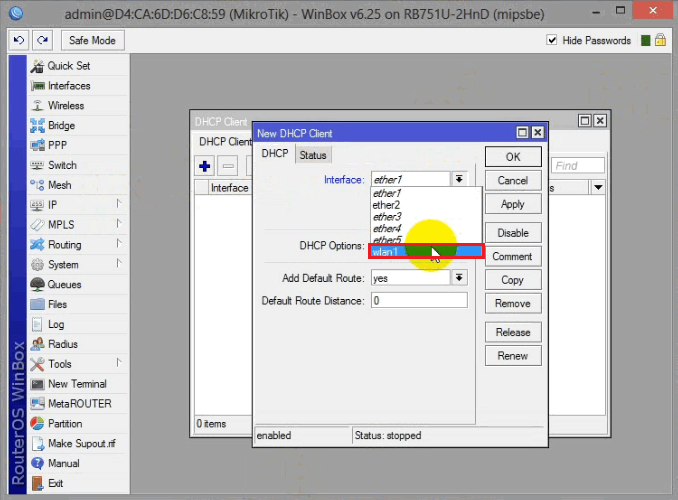
22. Ceklist "use peer DNS" dan "use peer NTP". Jika sudah, klik “Apply” dan “Ok”
22. Checkbox "use peer DNS" and "use NTP peer". If you already, click "Apply" and "Ok"

23. Jika status DHCP Client menjadi "bound", berarti DHCP Client sudah terkoneksi dengan DHCP Server
23. If the DHCP Client status become "bound", meaning DHCP Client is already connected to a DHCP Server

24. Klik "IP" yang berada di Tab Menu MikroTik Routerboard, kemudian pilih "DNS"
24. Click the "IP" tab located on the Menu MikroTik Routerboard, then select "DNS"
24. Click the "IP" tab located on the Menu MikroTik Routerboard, then select "DNS"

25. Secara otomatis, DNS Server akan terlihat di bagian kolom "Dynamic Servers", jadi anda disini klik "Ok" saja
25. Automatically, the DNS server will appear in the column "Dynamic Servers", so you here click "Ok" only

26. Buka Terminal dengan cara klik "New Terminal" yang berada di Tab Menu MikroTik Routerboard
26. Open the Terminal with clicking "New Terminal" tab located on the Menu MikroTik Routerboard
26. Open the Terminal with clicking "New Terminal" tab located on the Menu MikroTik Routerboard

27. Cek koneksi internet dengan ping ke gateway dan google
27. Check the Internet connection with ping to gateway and google

28. Lihat terlebih dahulu IP Address pada MikroTik Routerboard dengan menggunakan perintah #ip address print, terlihat IP Address yang diberikan oleh DHCP Server
28. See first IP address on MikroTik Routerboard with using the syntax #ip address print, seen IP address given by DHCP Server

29. Tambahkan IP Address pada interface "ether2" dengan menggunakan perintah
#ip address add address=<ip_address> interface=ether2
29. Add the IP address on the interface "ether2" with using the syntax
#ip address add address = <ip_address> interfaces = ether2
30. Lihat kembali IP Address yang sudah ditambahkan pada interface "ether2 di MikroTik Routerboard dengan menggunakan perintah #ip address print
30. Refer back to the IP address that has been added to the interface "ether2 in MikroTik Routerboard with using the syntax #ip address print

31. Tambahkan Firewall pada MikroTik Routerboard dengan menggunakan perintah
#ip firewall nat add chain=srcnat out-interface=public action=masquerade
31. Add Firewall on MikroTik RouterBOARD with using the syntax
#ip firewall nat add chain = srcnat out-interface = public action = masquerade
31. Add Firewall on MikroTik RouterBOARD with using the syntax
#ip firewall nat add chain = srcnat out-interface = public action = masquerade
32. Untuk melihat Firewall yang sudah ditambahkan pada MikroTik Routerboard, anda dapat menggunakan perintah #ip firewall print
32. To look Firewall that has been added on MikroTik Routerboard, you can using the syntax #ip firewall print

Uji Coba dengan Client
Testing the Client

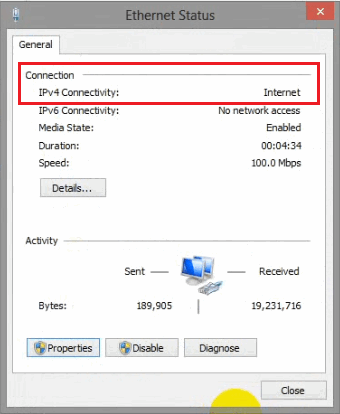
2. Terlihat pada IPv4 berubah statusnya menjadi "Internet"
2. Seen in IPv4 changed their status to "Internet"
3. Buka program “Command Prompt”, kemudian cek koneksi internet dengan ping ke gateway dan google
3. Open the program "Command Prompt", then check Internet connection with ping to gateway and google
 |
| ping ke gateway ping to gateway |
 |
| ping ke google ping to google |
4. Cek koneksi di MikroTik Routerboard, apakah terhubung dengan Client atau belum. Anda dapat menggunakan perintah #ping <ip_client>
4. Check the connections at MikroTik RouterBOARD, whether connected with Client or not. You can using the syntax #ping <ip_client>

5. Test di Client dengan membuka alamat web melalui aplikasi Mozila Firefox
5. Test on the Client with opening a web address through Mozilla Firefox application

Terima Kasih...
Semoga Bermanfaat
Thank You ...
Hope It Is Useful
Thank You ...
Hope It Is Useful


0 comments:
Post a Comment